Info_Icon Request Information
Help_Icon Customer Support
Service_Icon Schedule Service
VTEdu_Icon Education
Home_Icon Home Page
Products_Icon Products
AboutUs_Icon About US
Downloads_Icon Downloads

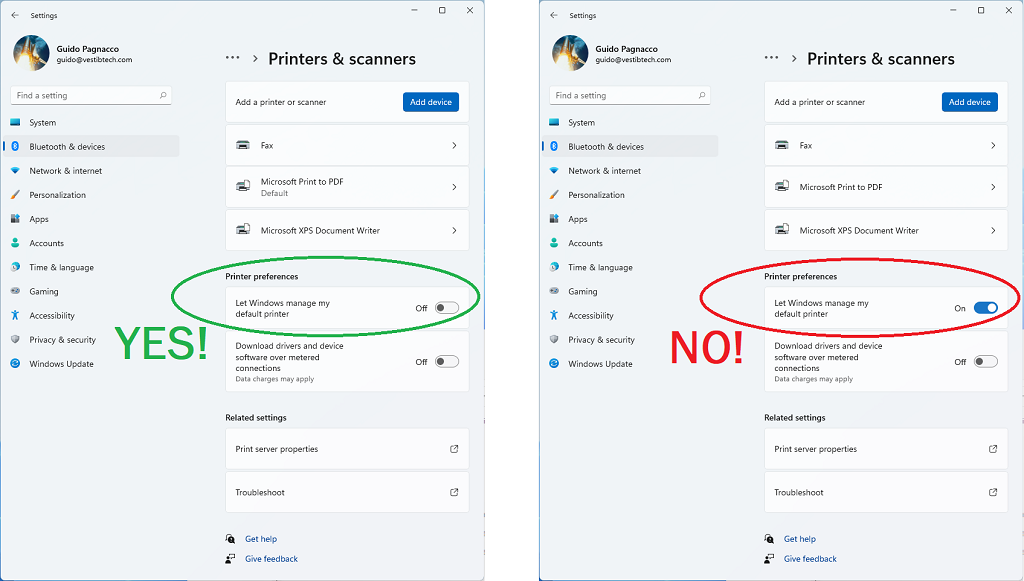
The CAPS® and Windows 11

Posturography_Icon Posturography
TBI_Icon TBI & Concussion Management
FallPrevention_Icon Fall Prevention
CAPS_RN_Icon Research
Windows 11 image

The CAPS® is Windows 11 compatible!

NOTE: you need administrative privileges to correctly install the CAPS® SW on Windows 11. If you do not have them, contact your IT or system administrator.

Follow these instructions to install the CAPS® on the latest Windows 11 OS:

  • Download the CAPS® SW installation
  • Follow the download instructions
  • Save the file on your computer (most likely, it is saved in your "Download" folder)
  • Right click on the installation file, and then click Extract All to extract all the installation files. You may want to extract them directly on the C: drive instead on in the "Download" folder, to permanently store the installation file on the CAPSĀ® computer.
  • Once the files have been extracted, browse to the "Drivers" folder, right click on VTPlateDrivers.exe (you might not see the .exe part) and select "Run as Administrator" to install the drivers following the instructions on the screen
  • Browse to the "VT Software" folder, right click on VTCAPSSoftware.msi (you may not see the .msi part) and select "Run as Administrator" to install the software following the instructions on the screen
  • Once the installation is complete, configure each VT software application:
    • right click on the VT software icon on your screen (there are four icons on the desktop, make sure you configure each one of them)
    • select Properties
    • go on the "Compatibility" tab
    • select Change Settings for All Users
    • in the Compatibility Mode check "Run this program in compatibility mode for" and then select from the drop down list "Windows XP (Service Pack 3)"
    • in the Settings check "Run this program as administrator"
    • click OK twice
  • install your license by copying the "*.lic" file you have received by email from us to the CAPS® computer, double click on it and follow the instructions on the screen. Do not try and open it up, you will get an error message.
    If you get an error message saying that the license could not be installed on the registry, you can manually install the license in the individual CAPS® SW Options/license tabs using the install license button (if, when you start the CAPS® SW, you see your information on the screen and when you connect the plate to the computer you have the license details, then the license has been installed. The error message is a Windows bug).
  • Configure your default printer in Windows 11 by turning OFF the "Let Windows manage my default printer" in the Settings/Bluetooth & devices/Printers & scanners/Printer preferences

  • Windows 11 Printer settings image